In this post, we are going to discuss the various techniques for morphing a mesh. In the previous post, we read about the different options available in Hypermorph for morphing a volume.
Just in case you missed the previous post you can check the important modules post to have a background about this post.
We can access Hypermorph by going to Tool -> Hypermorph.
We will start by getting familiar with the different options inside Hypermorph. As seen in the image below the options are divided into four columns.

The first column consists of features that affect morphing, the second column consists of options used for creating and editing morph entities, and the third column consists of options for performing morphing.
Features affecting morphing
We will start with the first column which consists of options like morphing constraints, systems, symmetry, and shapes. The morphing constraints option is used to fix nodes, we can fix nodes by the cluster nodes options, or fix nodes on planes or surfaces, etc. The systems option is used to create coordinate systems, it consists of options such as create by axis direction, create by node reference, assign, and material orientation.
Symmetry is used to create symmetry constraints. So what are symmetry constraints?
Symmetry constraints constrain the handles to move in symmetry about different planes of symmetry. This is very useful if want to morph the mesh symmetrically as it reduces the effort and chances of error. The are 2 basic symmetry groups:
- Reflective symmetries: This type of symmetry links handles symmetrically so that the movement of one handle causes the movement of the other handle which is symmetric. These symmetries can be used to reflect morphed domains using the alter dimensions option. The types of symmetries under this option are one-plane, two-plane, cyclical, unilateral, multilateral, approximate, and enforced.
- Non- Reflective symmetries: In this type of symmetry the handles will act as if they are the shape of the symmetry type, i.e. they create an illusion that the symmetric plane moves and nodes follow.
Now the shapes option is a bit different from the options we saw above. So what are shapes?
Shapes here refer to a collection of handle and or node perturbations from the initial configuration of the FE mesh before the morph. If you morph a mesh and then save it using the save option in the morph panel then we can access each morphed shape as each morphed shape will be stored as a separate shape. It helps you save the iterations of your morphed structure.
Creating and editing morph entities
The second column consists of morph volumes, domains, and handles. Now to understand these options we need to understand all these terms.
- Domains – To understand this we first need to understand what are domains and handles. We will start with the domain. Domain in general means an area or territory, thus domains here refer to segregating or selecting that localised part of the mesh that we want to morph by selecting the nodes or elements.
- Handles – Handle here means a holding point used to change the shape of the selected mesh or the morph volume. For creating handles we need to specify the domain in addition to the nodes.
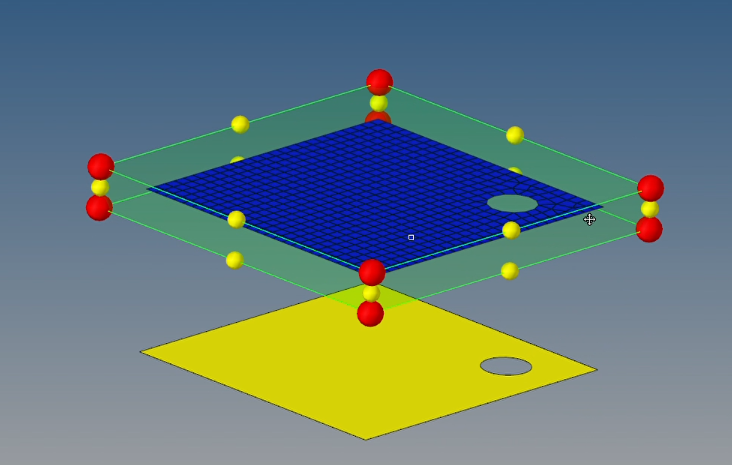
- Morph Volume – This is a volume that encloses the mesh selected for morphing. A cuboidal volume encloses the mesh if no shrinking option is selected.
The green box in the image below is the morph volume and the red and yellow circles are the handles.
Morphing options
Now the third column consists of morph, map to geom, and freehand. Starting with morph we can move the handles in domains or morphed volume manually by clicking on them or we can set the distance between these handles which will eventually change the shape of the volume, we can also set biasing and constraints for handles and nodes respectively.
Map to geom helps to map nodes directly to lines, surfaces, planes, etc. Freehand is used to directly move nodes without creating domains, morph volumes, or handles. We have to select the fixed and moving nodes in this
Procedure for Morphing a Mesh:
- Select the mesh or the specific elements that you want to morph.
- Then fix the nodes that you want to fix and apply symmetry constraints using the morphing constraints and symmetry option in the first column of options.
- Now enclose the mesh in a morph volume or use domains according to your need. You can also create handles manually if you need to.
- Use the morph option to move the handles to move the handles to change the shape of the mesh. You can also use the map to Geometry option if you want to map it to a line, or surface.
If you are using the freehand option for morphing the mesh you don’t need to create morph volume, domains, and handles. You can directly morph using the nodes.
You can refer to the below video for a practical demonstration of morphing a mesh.
This is all for this post. See you all in the next post. Don’t forget to follow my Facebook or Instagram page for regular updates. Till then keep learning.